-
Carlos Antonio De Lima Filho authoredCarlos Antonio De Lima Filho authored

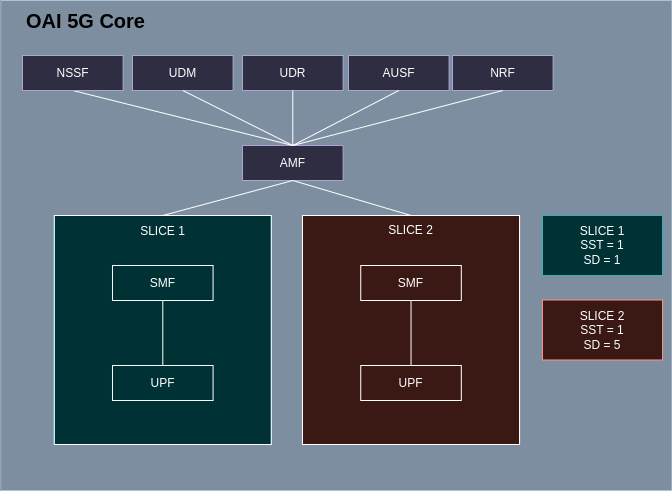
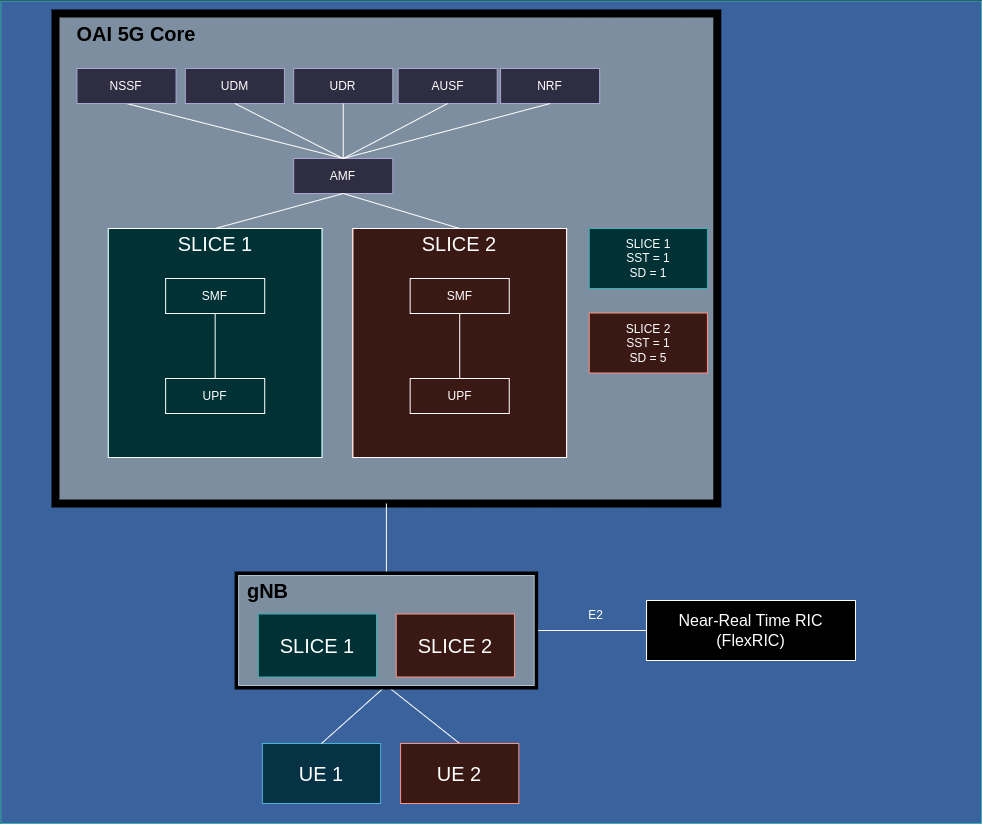
Installation and deployment of 5G Core (5GC) of Open Air Interface (OAI)
Objectives
- Install and configure the 5GC of OAI in a virtual machine Ubuntu 20.04 LTS (Focal Fossa)
- Deploy 5GC Core
- Inspec 5G Core Docker containers by means of command line instructions
- Install and configure Portainer tool
- Inspec 5G Core Docker containers by means of Portainer browser
Minimum hardware requirements for OAI UE, according to doc/NR_SA_Tutorial_COTS_UE.md · develop · oai / openairinterface5G · GitLab (eurecom.fr):
- Ubuntu 20.04.5 LTS;
- CPU: 4 cores x86_64;
- 8 GB RAM.
Minimum hardware requirements for OAI 5GC and OAI gNB, according to doc/NR_SA_Tutorial_COTS_UE.md · develop · oai / openairinterface5G · GitLab (eurecom.fr):
- Ubuntu 20.04.5 LTS;
- CPU: 8 cores x86_64 3.5 GHz;
- 32 GB RAM.
However, if you do not have such hardware specifications, you may use the one below for both devices (tested for us, you may face some lags, but it works):
- Ubuntu 20.04.5 LTS;
- CPU: 4 cores x86_64;
- 4 GB RAM.
5GC Installation
In a Linux Terminal, follow the steps below:
Step 0: Setup your VM or Baremetal Machine, after install Useful Software:
sudo su
apt update -y
apt upgrade -y
apt install -y python3-pip git curl cmake tree golang vim net-tools build-essential nfs-common openssh-server
Step 1: Install dependencies
sudo apt-get install ca-certificates
sudo apt-get install curl
sudo apt-get install gnupg
sudo apt-get install lsb-release
Step 2: Enable packet forwarding
sudo sysctl net.ipv4.conf.all.forwarding=1
sudo iptables -P FORWARD ACCEPT
Step 3: Install docker and docker-compose
sudo rm /etc/apt/sources.list.d/docker.list*
sudo mkdir -p /etc/apt/keyrings
curl -fsSL https://download.docker.com/linux/ubuntu/gpg | sudo apt-key add -
sudo add-apt-repository "deb [arch=amd64] https://download.docker.com/linux/ubuntu $(lsb_release -cs) stable"
sudo chmod a+r /etc/apt/keyrings/docker.gpg
sudo apt-get update
sudo apt-get install -y docker-ce docker-ce-cli containerd.io docker-compose-plugin
sudo curl -L https://github.com/docker/compose/releases/download/1.29.2/docker-compose-`uname -s
-uname -m` -o /usr/local/bin/docker-composesudo chmod +x /usr/local/bin/docker-compose
Step 4: Clone OpenAirInterface 5G Core repository
git clone https://gitlab.eurecom.fr/oai/cn5g/oai-cn5g-fed.git
cd oai-cn5g-fed
git checkout slicing-spring-of-code
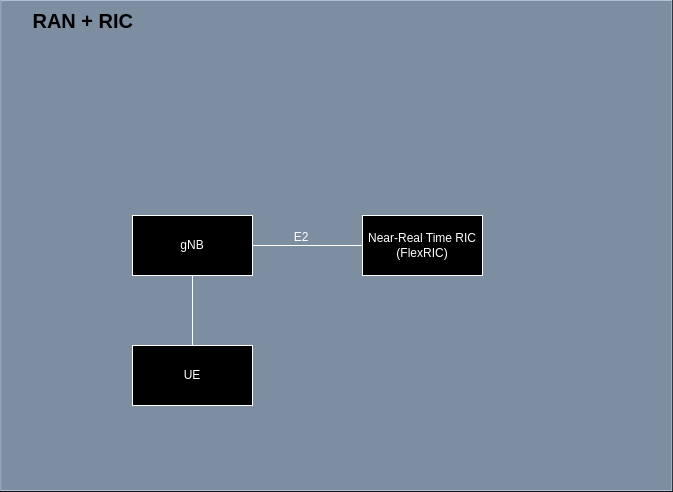
OAI 5G RAN, RIC (FlexRIC) and OAI UE Installations
Objectives
- Install the OAI 5G RAN (gNB)
- Install the FlexRIC
- Install OAI UE
To install OAI RAN 5G and OAI UE, go back for /home/
Step 0: go back to /home/
sudo su
cd /home/
your user
Step 1: Install dependencies
sudo add-apt-repository ppa:ettusresearch/uhd
sudo apt-get install libuhd-dev uhd-host -y
sudo apt-get install libuhd4.6.0 -y
sudo apt-get install ccache -y
sudo apt-get install net-tools
Step 2: Fix problem in the libuhd. When you run the commands below, if you get the error "cannot access archive", you can continue to the next step. sudo dpkg -i --force-overwrite /var/cache/apt/archives/libuhd4.6.0_4.6.0.0-0ubuntu1~focal1_amd64.deb
Step 3: Clone OpenAirInterface 5G RAN repository
git clone https://gitlab.eurecom.fr/oai/openairinterface5g.git
cd /home/
your user/openairinterface5ggit checkout slicing-spring-of-code
Step 4: Run the installation script
source oaienv
cd cmake_targets
sudo ./build_oai -I
sudo ./build_oai -I --install-optional-packages
sudo ./build_oai -w USRP --ninja --gNB --nrUE -C --build-lib "uescope nrscope telnetsrv"
To install RIC (FlexRIC), go back to /home/
Step 0: go back to /home/
sudo su
cd /home/
your user
Step 1: Install dependencies:
sudo apt-get install -y autotools-dev automake g++ make libpcre2-dev byacc cmake python3-dev libsctp-dev pcre2-utils bison
Step 2: Install swig:
cd /home/
your usergit clone https://github.com/swig/swig.git
cd swig
git checkout release-4.1
./autogen.sh
./configure --prefix=/usr/
make -j8
sudo make install
Step 3: Clone FlexRIC repository:
git clone https://gitlab.eurecom.fr/mosaic5g/flexric flexric
cd flexric/
git checkout slicing-spring-of-code
Step 4: Build FlexRIC:
mkdir build && cd build && cmake .. && make -j8
sudo make install
RAN (gNB) Configuration
In a Linux Terminal, follow the steps below:
Step 1: Configure the PLMN and TAC values
The Public Land Mobile Network (PLMN) and Tracking Area Code (TAC) will be configured in the gNB (/home/dco1020/openairinterface5g/targets/PROJECTS/GENERIC-NR-5GC/CONF/gnb.sa.band78.fr1.106PRB.usrpb210.conf) configuration file.
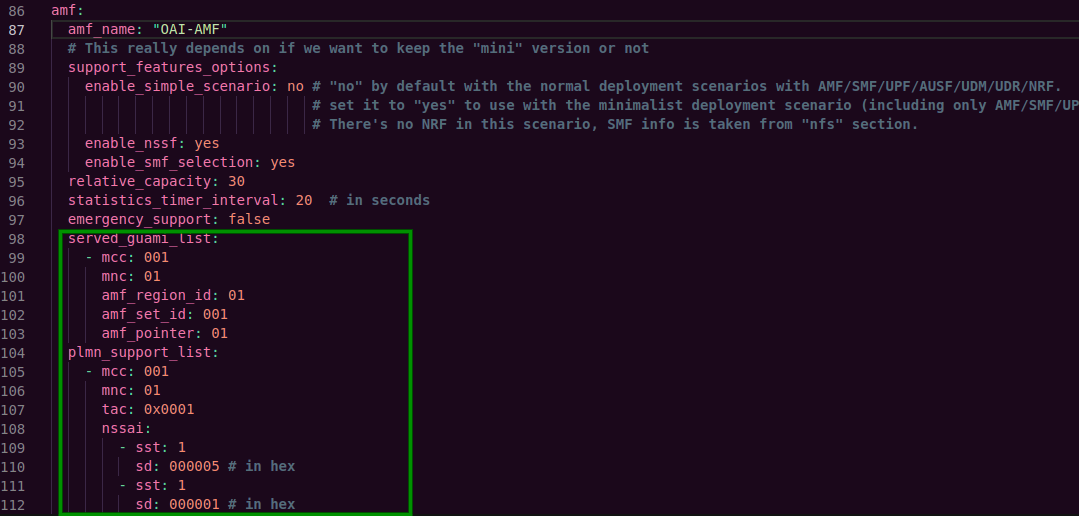
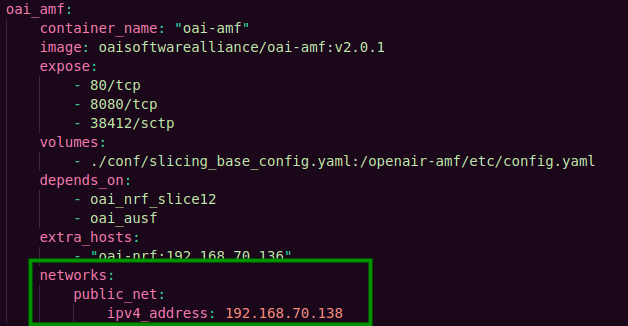
Figure below shows the part of the code that must be modified in the CU and DU files (lines 17 and 18). The parameters shown in figure should be modified according to the values present in docker compose in the "oai-amf" session (/home/dco1020/oai-cn5g-fed/docker-compose/docker-compose-slicing-basic-nrf.yaml).

Figure below shows the parameters that should be checked and passed to the monolithic configuration file: PLMN_SUPPORT_TAC (referring to "tracking_area_code"), PLMN_SUPPORT_MCC (referring to "mcc"), PLMN_SUPPORT_MNC (referring to "mnc"), SST_0 (referring to "sst") and the SD_0 (referring to "sd"). If the "sd" parameter is not in the monolithic configuration file, simply add it according to line 18 in previous figure.
Open files by typing:
gedit /home/dco1020/openairinterface5g/targets/PROJECTS/GENERIC-NR-5GC/CONF/gnb.sa.band78.fr1.106PRB.usrpb210.conf
gedit /home/dco1020/oai-cn5g-fed/docker-compose/conf/slicing_base_config.yaml
Step 2: Configure the network interfaces
This part you will configure the N2 interface in (/home/dco1020/openairinterface5g/targets/PROJECTS/GENERIC-NR-5GC/CONF/gnb.sa.band78.fr1.106PRB.usrpb210.conf), such as in figure below. This interface is responsible to connect the gNB and the AMF.
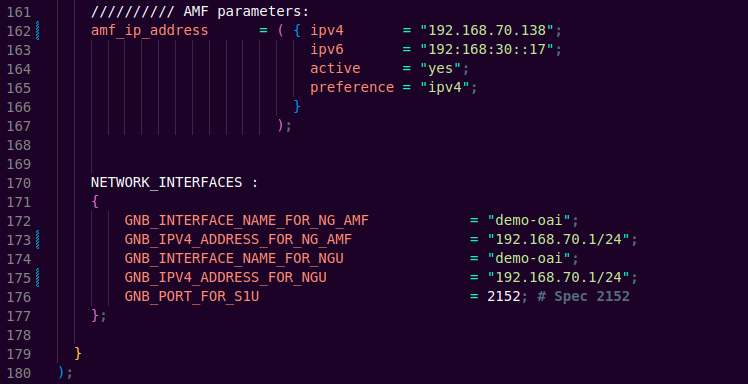
You need to verify/change the IP addresses. You can find the OAI-AMF IP address inside /home/dco1020/oai-cn5g-fed/docker-compose/docker-compose-slicing-basic-nrf.yaml, such as in figure below. You must get this IP address and put it in the "amf_ip_address" parameter, in the "ipv4" field (such as in previous figure).
Check if the IP Address of cu_gnb.conf is the same of docker-compose-basic-nrf.yaml. To edit cu_gnb.conf, type:
gedit /home/dco1020/openairinterface5g/targets/PROJECTS/GENERIC-NR-5GC/CONF/cu_gnb.conf
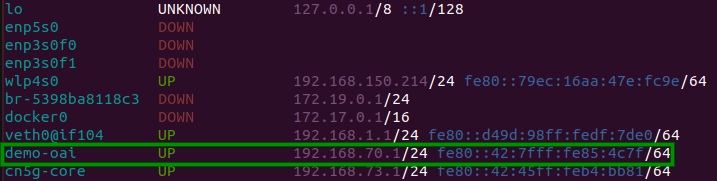
Step 3: to check a virtual interface (demo-oai), type:
ip -br -c a
You should find a virtual interface (demo-oai) (as shown in figure below). This interface serves to connect the CU with OAI-AMF. You must get its IP address and name to configure the N2 interface such as two figures before.
UE 1 Configurations
Objectives
- Configure the OAI UE 1
Step 1: Creating a namespace:
sudo ip netns add oai-ue1
Step 2: Creating a pair of virtual interfaces (veth):
sudo ip link add veth0 type veth peer name veth1
Step 3: Moving one interface to the created namespace:
sudo ip link set veth1 netns oai-ue1
Step 4: Configuring an IP address for veth0 interface:
sudo ip addr add 192.168.1.1/24 dev veth0
Step 5: Configuring an IP address for veth1 interface within the namespace:
sudo ip netns exec oai-ue1 ip addr add 192.168.1.2/24 dev veth1
Step 6: Bringing up the veth0 interface:
sudo ip link set veth0 up
Step 7: Bringing up the veth1 interface within the namespace:
sudo ip netns exec oai-ue1 ip link set veth1 up
Step 8: Adding a route within the namespace:
sudo ip netns exec oai-ue1 ip route add 192.168.70.0/24 via 192.168.1.1 dev veth1
Step 9: Enabling packet forwarding within the namespace:
sudo ip netns exec oai-ue1 sysctl net.ipv4.conf.all.forwarding=1
Step 10: Setting default policy for packet forwarding within the namespace to ACCEPT::
sudo ip netns exec oai-ue1 iptables -P FORWARD ACCEPT
Step 11: Configure the IMSI, Permanent Key and OPC
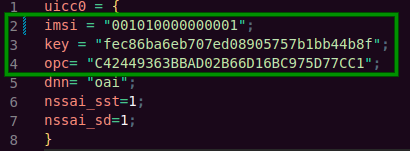
This part you will configure the UE parameters. The UE parameters file is /home/dco1020/openairinterface5g/targets/PROJECTS/GENERIC-NR-5GC/CONF/ue.conf. The first three lines of the file are composed by the IMSI, Permanent Key and OPC, as shown in figure below. You will configure these parameters.
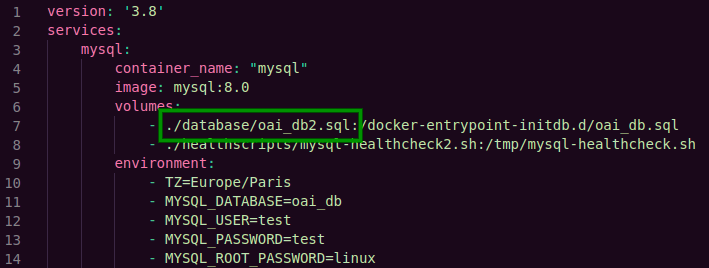
You need to check in the docker-compose file (/home/dco1020/oai-cn5g-fed/docker-compose/database/oai_db2.sql) which SQL file the core is using. See figure below.
Verify/change the parameters in UE file (/home/dco1020/openairinterface5g/targets/PROJECTS/GENERIC-NR-5GC/CONF/ue.conf) according to the SQL file illustrated in figure below. The parameters are:
- "ueid" refers to "imsi"
- "encPermanentKey" refers to "key"
- "encOpcKey" refers to "opc
To open UE file, type:
gedit /home/dco1020/openairinterface5g/targets/PROJECTS/GENERIC-NR-5GC/CONF/ue.conf
To open Docker Composer file, type:
gedit /home/dco1020/oai-cn5g-fed/docker-compose/docker-compose-slicing-basic-nrf.yaml
To see sqlFile, type in a terninal.
gedit /home/dco1020/oai-cn5g-fed/docker-compose/database/oai_db2.sql
Or use a SQLLite database visualizer like DB Browser (to install: sudo apt install sqlitebrowser -y).
The last three lines of the file are composed of DNN (Data Network Name), N-SSAI SST (Network Slice Selection Assistance Information Slice/Service Type), N-SSAI SD (Network Slice Selection Assistance Information Slice/Service Type). To configure these parameters you will explore the docker-compose file (/home/dco1020/oai-cn5g-fed/docker-compose/docker-compose-basic-nrf.yaml), shown in figure below.
The UE parameters (figure below) must be equal to the OAI SMF parameters in the docker-compose file, as illustrated in the figure below.
- "DNN_NI0" refers to "dnn"
- "NSSAI_SST0" refers to "nssai_sst"
- "NSSAI_SD0" refers to "nssai_sd" (the "NSSAI_SD0" parameter is in hexadecimal, but in the "nssai_sd" parameter you have to use decimal values)

Note: In this version of the tutorial, the network slice is limited a just one slice (DNN=oai), because we do not use the NSSF (Network Slice Selection Function).
UE 2 Configurations
Objectives
- Configure the OAI UE 2
Step 1: Creating a namespace:
sudo ip netns add oai-ue2
Step 2: Creating a pair of virtual interfaces (veth):
sudo ip link add veth1 type veth peer name veth2
Step 3: Moving one interface to the created namespace:
sudo ip link set veth2 netns oai-ue2
Step 4: Configuring an IP address for veth1 interface:
sudo ip addr add 192.168.2.1/24 dev veth1
Step 5: Configuring an IP address for veth1 interface within the namespace:
sudo ip netns exec oai-ue2 ip addr add 192.168.2.2/24 dev veth2
Step 6: Bringing up the veth1 interface:
sudo ip link set veth1 up
Step 7: Bringing up the veth1 interface within the namespace:
sudo ip netns exec oai-ue2 ip link set veth2 up
Step 8: Adding a route within the namespace:
sudo ip netns exec oai-ue2 ip route add 192.168.70.0/24 via 192.168.2.1 dev veth2
Step 9: Enabling packet forwarding within the namespace:
sudo ip netns exec oai-ue2 sysctl net.ipv4.conf.all.forwarding=1
Step 10: Setting default policy for packet forwarding within the namespace to ACCEPT::
sudo ip netns exec oai-ue2 iptables -P FORWARD ACCEPT
Step 11: Copy the UE file:
cp /home/
your user/openairinterface5g/targets/PROJECTS/GENERIC-NR-5GC/CONF/ue.conf /home/your user/openairinterface5g/targets/PROJECTS/GENERIC-NR-5GC/CONF/ue2.conf
Scenario deployment
Objectives
- Deploy 5GC, 5G RAN, FlexRIC and OAI UE
Use a separate terminal for each of the following steps.
Step 1: Core deployment?
cd /home/
your user/oai-cn5g-fed/docker-composedocker compose -f docker-compose-slicing-basic-nrf.yaml up -d
Expected result:
After running the above command, nine containers are expected to be in the "Up (healthy)" state as shown in figure below.

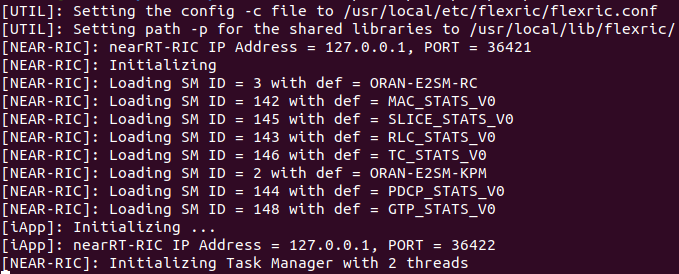
Step 2: FlexRIC deployment:
cd flexric/
./build/examples/ric/nearRT-RIC
After running the above command the expect result is shown in figure below.
Step 3: gNB deployment:
Attention: You must have Core 5G up and running
Step 3.1: gNB deploy:
sudo su
cd /home/
your user/openairinterface5g/cmake_targets/ran_build/build/sudo RFSIMULATOR=server ./nr-softmodem --rfsim --sa -O ../../../targets/PROJECTS/GENERIC-NR-5GC/CONF/gnb.sa.band78.fr1.106PRB.usrpb210.conf --gNBs.[0].min_rxtxtime 6 --continuous-tx
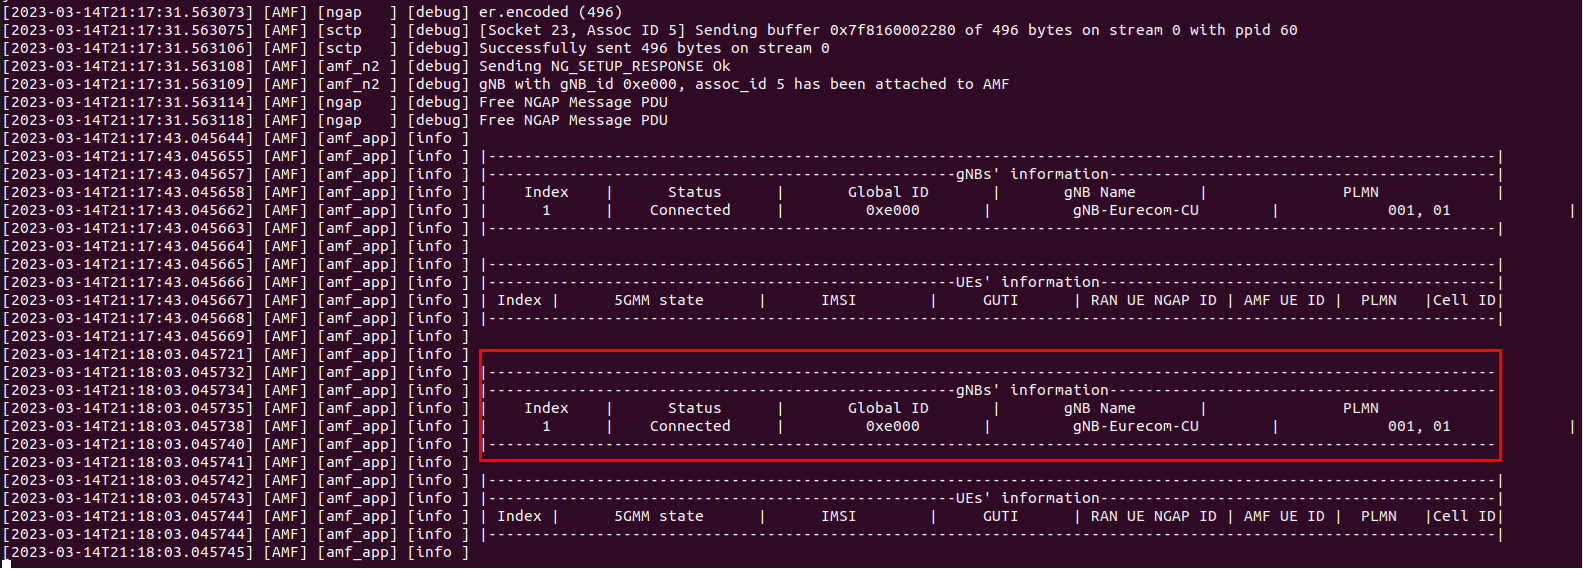
Step 3.2: To check the connection of gNodeB to the Core, see AMF logs. Open a terminal and use the command below:
docker logs -f oai-amf
The expected return is shown in figure below, where gNodeB shows the connected status.
Step 4: UE 1 deployment:
sudo ip netns exec oai-ue1 bash
cd /home/
your user/openairinterface5g/cmake_targets/ran_build/build/sudo RFSIMULATOR=192.168.1.1 ./nr-uesoftmodem -r 106 --numerology 1 --band 78 -C 3619200000 --rfsim --sa --nokrnmod -O ../../../targets/PROJECTS/GENERIC-NR-5GC/CONF/ue.conf
Step 5: UE 2 deployment:
sudo ip netns exec oai-ue2 bash
cd /home/
your user/openairinterface5g/cmake_targets/ran_build/build/sudo RFSIMULATOR=192.168.2.1 ./nr-uesoftmodem -r 106 --numerology 1 --band 78 -C 3619200000 --rfsim --sa --nokrnmod -O ../../../targets/PROJECTS/GENERIC-NR-5GC/CONF/ue2.conf