-
Carlos Antonio De Lima Filho authoredCarlos Antonio De Lima Filho authored

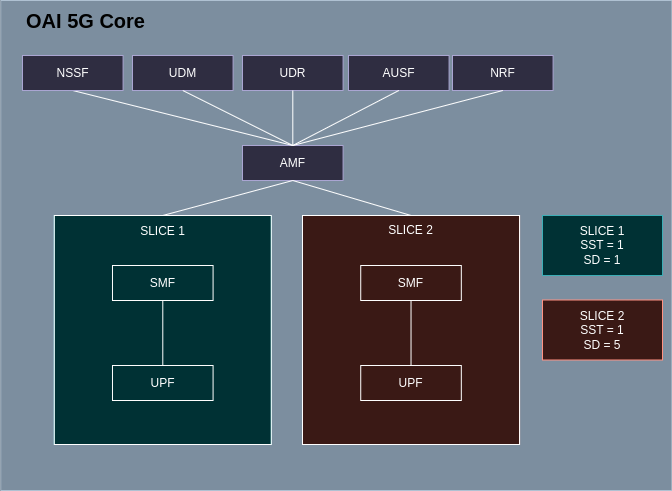
Installation and deployment of 5G Core (5GC) of Open Air Interface (OAI)
Objectives
- Install and configure the 5GC of OAI in a virtual machine Ubuntu 20.04 LTS (Focal Fossa)
- Deploy 5GC Core
- Inspec 5G Core Docker containers by means of command line instructions
- Install and configure Portainer tool
- Inspec 5G Core Docker containers by means of Portainer browser
Minimum hardware requirements for OAI UE, according to doc/NR_SA_Tutorial_COTS_UE.md · develop · oai / openairinterface5G · GitLab (eurecom.fr):
- Ubuntu 20.04.5 LTS;
- CPU: 4 cores x86_64;
- 8 GB RAM.
Minimum hardware requirements for OAI 5GC and OAI gNB, according to doc/NR_SA_Tutorial_COTS_UE.md · develop · oai / openairinterface5G · GitLab (eurecom.fr):
- Ubuntu 20.04.5 LTS;
- CPU: 8 cores x86_64 3.5 GHz;
- 32 GB RAM.
However, if you do not have such hardware specifications, you may use the one below for both devices (tested for us, you may face some lags, but it works):
- Ubuntu 20.04.5 LTS;
- CPU: 4 cores x86_64;
- 4 GB RAM.
5GC Installation
In a Linux Terminal, follow the steps below:
Step 0: Setup your VM or Baremetal Machine, after install Useful Software:
sudo su
apt update -y
apt upgrade -y
apt install -y python3-pip git curl cmake tree golang vim net-tools build-essential nfs-common openssh-server
Step 1: Install dependencies
sudo apt-get install ca-certificates
sudo apt-get install curl
sudo apt-get install gnupg
sudo apt-get install lsb-release
Step 2: Enable packet forwarding
sudo sysctl net.ipv4.conf.all.forwarding=1
sudo iptables -P FORWARD ACCEPT
Step 3: Install docker and docker-compose
sudo rm /etc/apt/sources.list.d/docker.list*
sudo mkdir -p /etc/apt/keyrings
curl -fsSL https://download.docker.com/linux/ubuntu/gpg | sudo apt-key add -
sudo add-apt-repository "deb [arch=amd64] https://download.docker.com/linux/ubuntu $(lsb_release -cs) stable"
sudo chmod a+r /etc/apt/keyrings/docker.gpg
sudo apt-get update
sudo apt-get install -y docker-ce docker-ce-cli containerd.io docker-compose-plugin
sudo curl -L https://github.com/docker/compose/releases/download/1.29.2/docker-compose-`uname -s
-uname -m` -o /usr/local/bin/docker-composesudo chmod +x /usr/local/bin/docker-compose
Step 4: Clone OpenAirInterface 5G Core repository
git clone https://gitlab.eurecom.fr/oai/cn5g/oai-cn5g-fed.git
cd oai-cn5g-fed
git checkout slicing-spring-of-code
OAI 5G RAN, RIC (FlexRIC) and OAI UE Installations

Objectives
- Install the OAI 5G RAN (gNB)
- Install the FlexRIC
- Install OAI UE
To install OAI RAN 5G and OAI UE, go back for /home/
Step 0: go back to /home/
sudo su
cd /home/
your user
Step 1: Install dependencies
sudo add-apt-repository ppa:ettusresearch/uhd
sudo apt-get install libuhd-dev uhd-host -y
sudo apt-get install libuhd4.6.0 -y
sudo apt-get install ccache -y
sudo apt-get install net-tools
Step 2: Fix problem in the libuhd. When you run the commands below, if you get the error "cannot access archive", you can continue to the next step. sudo dpkg -i --force-overwrite /var/cache/apt/archives/libuhd4.6.0_4.6.0.0-0ubuntu1~focal1_amd64.deb
Step 3: Clone OpenAirInterface 5G RAN repository
git clone https://gitlab.eurecom.fr/oai/openairinterface5g.git
cd /home/
your user/openairinterface5ggit checkout slicing-spring-of-code
Step 4: Run the installation script
source oaienv
cd cmake_targets
sudo ./build_oai -I
sudo ./build_oai -I --install-optional-packages
sudo ./build_oai -w USRP --ninja --gNB --nrUE -C --build-lib "uescope nrscope telnetsrv"
To install RIC (FlexRIC), go back to /home/
Step 0: go back to /home/
sudo su
cd /home/
your user
Step 1: Install dependencies:
sudo apt-get install -y autotools-dev automake g++ make libpcre2-dev byacc cmake python3-dev libsctp-dev pcre2-utils bison
Step 2: Install swig:
cd /home/
your usergit clone https://github.com/swig/swig.git
cd swig
git checkout release-4.1
./autogen.sh
./configure --prefix=/usr/
make -j8
sudo make install
Step 3: Clone FlexRIC repository:
git clone https://gitlab.eurecom.fr/mosaic5g/flexric flexric
cd flexric/
git checkout slicing-spring-of-code
Step 4: Build FlexRIC:
mkdir build && cd build && cmake .. && make -j8
sudo make install
UE 1 Configurations
Objectives
- Configure the OAI UE 1
Step 1: Creating a namespace:
sudo ip netns add oai-ue1
Step 2: Creating a pair of virtual interfaces (veth):
sudo ip link add veth0 type veth peer name veth1
Step 3: Moving one interface to the created namespace:
sudo ip link set veth1 netns oai-ue1
Step 4: Configuring an IP address for veth0 interface:
sudo ip addr add 192.168.1.1/24 dev veth0
Step 5: Configuring an IP address for veth1 interface within the namespace:
sudo ip netns exec oai-ue1 ip addr add 192.168.1.2/24 dev veth1
Step 6: Bringing up the veth0 interface:
sudo ip link set veth0 up
Step 7: Bringing up the veth1 interface within the namespace:
sudo ip netns exec oai-ue1 ip link set veth1 up
Step 8: Adding a route within the namespace:
sudo ip netns exec oai-ue1 ip route add 192.168.70.0/24 via 192.168.1.1 dev veth1
Step 9: Enabling packet forwarding within the namespace:
sudo ip netns exec oai-ue1 sysctl net.ipv4.conf.all.forwarding=1
Step 10: Setting default policy for packet forwarding within the namespace to ACCEPT::
sudo ip netns exec oai-ue1 iptables -P FORWARD ACCEPT
UE 2 Configurations
Objectives
- Configure the OAI UE 2
Step 1: Creating a namespace:
sudo ip netns add oai-ue2
Step 2: Creating a pair of virtual interfaces (veth):
sudo ip link add veth1 type veth peer name veth2
Step 3: Moving one interface to the created namespace:
sudo ip link set veth2 netns oai-ue2
Step 4: Configuring an IP address for veth1 interface:
sudo ip addr add 192.168.1.1/24 dev veth1
Step 5: Configuring an IP address for veth1 interface within the namespace:
sudo ip netns exec oai-ue2 ip addr add 192.168.1.2/24 dev veth2
Step 6: Bringing up the veth1 interface:
sudo ip link set veth1 up
Step 7: Bringing up the veth1 interface within the namespace:
sudo ip netns exec oai-ue2 ip link set veth2 up
Step 8: Adding a route within the namespace:
sudo ip netns exec oai-ue2 ip route add 192.168.70.0/24 via 192.168.1.1 dev veth2
Step 9: Enabling packet forwarding within the namespace:
sudo ip netns exec oai-ue2 sysctl net.ipv4.conf.all.forwarding=1
Step 10: Setting default policy for packet forwarding within the namespace to ACCEPT::
sudo ip netns exec oai-ue2 iptables -P FORWARD ACCEPT
Step 11: Copy the UE file:
cp /home/
your user/openairinterface5g/targets/PROJECTS/GENERIC-NR-5GC/CONF/ue.conf /home/your user/openairinterface5g/targets/PROJECTS/GENERIC-NR-5GC/CONF/ue2.conf
Deployments
Objectives
- Deploy 5GC, 5G RAN, FlexRIC and OAI UE
Use a separate terminal for each of the following steps.
Step 1: Core deployment?
cd /home/
your user/oai-cn5g-fed/docker-composedocker compose -f docker-compose-slicing-basic-nrf.yaml up -d
Expected result:
After running the above command, nine containers are expected to be in the "Up (healthy)" state as shown in figure below.

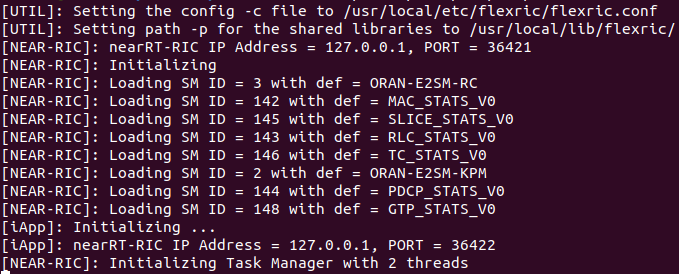
Step 2: FlexRIC deployment:
cd flexric/
./build/examples/ric/nearRT-RIC
After running the above command the expect result is shown in figure below.
Step 3: gNB deployment:
Attention: You must have Core 5G up and running
Step 3.1: gNB deploy:
sudo su
cd /home/
your user/openairinterface5g/cmake_targets/ran_build/build/sudo RFSIMULATOR=server ./nr-softmodem --rfsim --sa -O ../../../targets/PROJECTS/GENERIC-NR-5GC/CONF/gnb.sa.band78.fr1.106PRB.usrpb210.conf --gNBs.[0].min_rxtxtime 6 --continuous-tx
Step 3.2: To check the connection of gNodeB to the Core, see AMF logs. Open a terminal and use the command below:
docker logs -f oai-amf
The expected return is shown in figure below, where gNodeB shows the connected status.

Step 4: UE 1 deployment:
sudo ip netns exec oai-ue1 bash
cd /home/
your user/openairinterface5g/cmake_targets/ran_build/build/sudo RFSIMULATOR=192.168.1.2 ./nr-uesoftmodem -r 106 --numerology 1 --band 78 -C 3619200000 --rfsim --sa --nokrnmod -O ../../../targets/PROJECTS/GENERIC-NR-5GC/CONF/ue.conf
Step 5: UE 2 deployment:
sudo ip netns exec oai-ue2 bash
cd /home/
your user/openairinterface5g/cmake_targets/ran_build/build/sudo RFSIMULATOR=192.168.1.2 ./nr-uesoftmodem -r 106 --numerology 1 --band 78 -C 3619200000 --rfsim --sa --nokrnmod -O ../../../targets/PROJECTS/GENERIC-NR-5GC/CONF/ue2.conf